
Diskpart is a powerful command-line tool included in Windows that allows you to manage your disks and volumes. One of the things you can do with the “diskpart” command is delete a partition on your hard drive. This can be useful if you want to remove an unused partition forcefully or reformat your drive.
In this article, I’ll walk you through the steps to use diskpart to delete a partition in Windows 10 or 11.
IMPORTANT DATA-LOSS WARNING: Diskpart changes take effect immediately. Deleting a partition removes access to all data stored on it, and selecting the wrong disk or partition can make Windows or other files unusable. Back up important data before continuing.
Before you run any delete command, disconnect unnecessary external drives and verify the target with list disk, select disk X, detail disk, list partition, and list volume. Confirm the disk number, capacity, model, partition number, filesystem, and volume label all match the device you intend to modify.
Table of Contents
Prerequisites
Before deleting a partition in Windows, it’s important to understand what you’re deleting and the implications. When you delete a partition, you will lose all data stored on that partition permanently. So don’t delete partitions that contain important files you want to keep!
It’s also a good idea to backup any data you want to save before deleting a partition. And make sure you identify the drive letter or name of the partition you want to delete to avoid accidentally removing the wrong one.
Diskpart Delete Partition – Steps
Using Diskpart to delete a partition doesn’t require any special downloads or configuration.
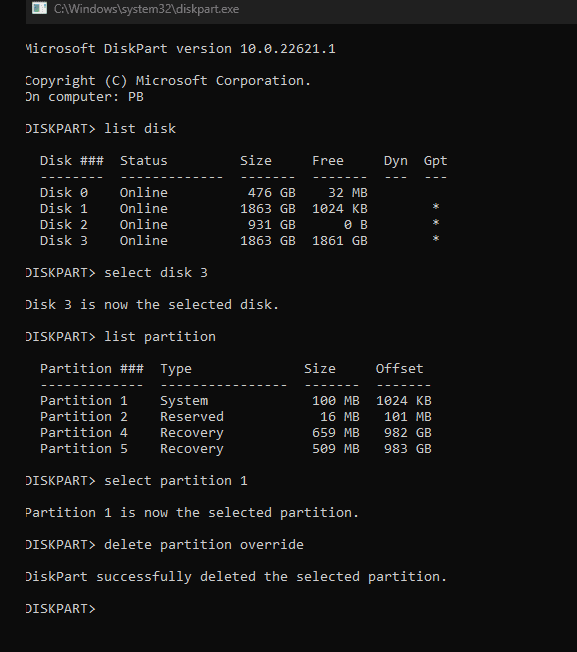
Follow these steps: (All the below commands can be seen in the image after these instructions)
- Type ‘diskpart’ in the Windows command line prompt or press CTRL +R to bring the run window and type ‘diskpart‘ to open diskpart command console or cli.
- Type ‘list disk‘ and identify the disk number of the disk containing the partition you want to delete. Make note of the size to verify it’s the correct disk.
- Type ‘select disk X‘ where X is the disk number. This will select the target disk. We are selecting disk 3 in this example.
- Type ‘list partition‘ to view the partitions on the selected disk. Identify the partition number of the partition to delete.
- Type ‘select partition Y‘ where Y is the partition number. This marks the target partition.
- Type ‘delete partition override‘ to delete the selected partition. Use the override option to force deletion.
- Type ‘clean‘ to fully remove the partition.
- Type ‘exit‘ to close the Diskpart console
The partition is now deleted. You can use disk management or diskpart to create a new partition if needed.
Below is the command to create a partition, follow the above steps from 1-4.
- Type ‘create partition primary’ to create a new primary partition in the freed space if desired.
You can see diskpart delete partition in action through the below screenshot.
In the below example, we have delete the partition having system files. Don’t delete those as they are Windows system & recovery files.
Additional Examples
Here are some additional examples of using diskpart command to delete partitions:
1. Delete partition 2 on disk 1:
select disk 1
select partition 2
delete partition override2. Delete partition with volume label “Data”:
select volume Data
delete partition override3. Delete system partition:
select disk 0
select partition 1
delete partition override
As you can see, diskpart provides a simple way to delete partitions directly from the Windows command line. Just be sure you select the correct disk and partition to avoid deleting the wrong volume. And remember – deleting a partition removes all data, so back up anything important first!
Critical Clarification: The clean Command
Important: The clean command does not delete only the selected partition. It removes partition and volume formatting information from the entire selected disk, making every partition on that disk inaccessible. If your goal is to delete one partition, stop after delete partition override and do not run clean. Use clean only when you intentionally want to erase the partition layout of the entire selected disk and have verified that you have a complete backup.
How to Verify the Correct Disk and Partition
After running select disk X, use the following commands before deleting anything:
detail disk
list partition
list volume
Compare the disk model, capacity, free space, partition number, filesystem, drive letter, and volume label with Windows Disk Management. After selecting the partition, run detail partition as one final check. If any detail is unexpected, type exit and stop.
Safer Command Sequence for Deleting One Partition
The following sequence deletes only the selected partition and deliberately excludes the disk-wide clean command:
list disk
select disk X
detail disk
list partition
select partition Y
detail partition
delete partition override
list partition
exit
Replace X and Y with the verified disk and partition numbers. Read the output after every selection command rather than copying and running the entire sequence at once.
Can You Recover a Deleted Partition?
Partition recovery may be possible, but it is not guaranteed. If you deleted the wrong partition, stop using the affected disk immediately. Do not create a new partition, format the disk, copy files to it, or run clean, because additional writes can overwrite information needed for recovery.
If the data is important, disconnect the disk and use a reputable recovery tool from another drive or contact a professional data-recovery service. Restore from your backup whenever possible.
Final Safety Checklist
- Back up every important file stored on the target partition.
- Disconnect external drives that are not needed for the task.
- Verify the disk number, model, capacity, partition number, drive letter, and volume label.
- Do not delete EFI, recovery, OEM, or Windows system partitions unless you are intentionally rebuilding the computer and have recovery media.
- Do not run
cleanwhen you only want to delete one partition.
